
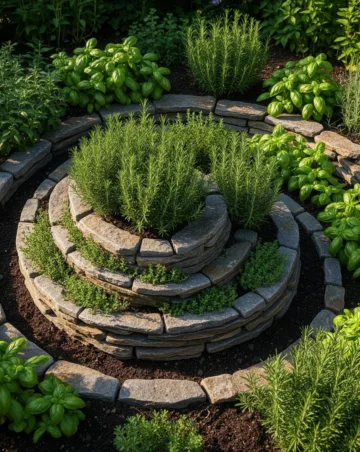
The Ultimate Guide to Building a Vertical Herb Oasis in Small Spaces
Whay Every Garden Needs a Vertical Culinary Hub
Have you ever found yourself frustrated by a lack of space, or perhaps you’re tired of trekking to the far corner of your yard just to grab a sprig of rosemary for dinner? If you want to grow a massive amount of food in a tiny footprint, the herb spiral garden is the ultimate solution. This permaculture classic isn’t just a beautiful landscape feature; it’s a functional powerhouse that uses vertical space and gravity to create multiple microclimates in one spot. Whether you have a sprawling backyard or a modest suburban patch, starting a diy herb spiral allows you to mimic natural ecosystems, ensuring your Mediterranean herbs stay dry while your water-loving mint stays lush.
The Magic of the Spiral Design
Understanding the Microclimate Concept
The genius of the spiral lies in its shape. By building upward in a corkscrew pattern, you create different environmental zones. The top of the spiral is the sunniest and driest, perfect for plants that thrive in well-drained soil. As the spiral winds downward, it creates shadows and retains more moisture, catering to plants that prefer cooler, damper conditions.
Maximizing Edge Space
In gardening, the “edge” is where the most biological activity happens. A spiral increases the “edge” of your garden bed significantly compared to a flat circle or square. This means more planting surface area for you and more diversity for the beneficial insects in your yard.
Choosing the Perfect Location
Proximity to the Kitchen
The number one rule of herb gardening is to place it as close to your kitchen door as possible. If you have to put on boots and walk across a muddy lawn, you won’t use your fresh herbs as often. Aim for a spot within thirty feet of your cooking area.
Sunlight Requirements
Most culinary herbs require at least six to eight hours of direct sunlight. Ensure your chosen spot isn’t permanently shaded by large trees or buildings. Since the spiral creates its own shade on the northern side (in the Northern Hemisphere), a full-sun location is actually ideal.
Materials and Preparation
Selecting Your Building Blocks
You can build a spiral out of almost anything durable. Popular choices include:
- Natural Fieldstone: Provides a rustic look and excellent thermal mass.
- Brick: Great for a formal, clean aesthetic.
- Cinder Blocks: Inexpensive and very stable.
- Recycled Concrete (Urbanite): An eco-friendly way to reuse old sidewalk pieces.
Soil and Drainage Layers
You’ll need a mix of high-quality topsoil, finished compost, and perhaps some coarse sand or perlite for the top sections to increase drainage.
Step-by-Step Instructions for Your Vertical Garden
Building your own herb spiral garden is a rewarding weekend project that requires more “brawn” than “brain,” but following a logical sequence is key. First, clear a circular area roughly five to six feet in diameter. Lay down a layer of cardboard to smother any existing grass or weeds. Mark the center and use a string to trace a perfect circle. Now, begin laying your base stones in a spiral shape, starting from the outer edge and winding inward.
As you start your diy herb spiral, remember that the “spine” or the center of the spiral needs to be the highest point, usually reaching about two to three feet tall. Gradually slope the stones downward as you move toward the outer tail. Once the skeleton is built, fill the bottom with “filler” like small branches or rocks to save on soil costs, then top it off with your high-quality soil mix. Firm the soil down as you go to prevent future settling.
What to Plant and Where
The Top (High and Dry)
This area gets the most sun and drains the fastest. It stays warm because the stones soak up the sun’s heat.
- Rosemary: Loves the heat and sharp drainage.
- Thyme: Thrives in the rocky crevices.
- Oregano: Enjoys the sun-drenched peak.
The Middle (Moderate Moisture)
This section offers a balance of sun and shade throughout the day.
- Sage: Prefers a bit of stability in soil moisture.
- Lavender: Needs sun but appreciates slightly more room for roots than the very top.
- Coriander/Cilantro: Benefits from the slight shade provided by the upper tiers.
The Bottom (Cool and Moist)
Water naturally flows down the spiral, making the base the dampest area.
- Mint: A water hog that will appreciate the runoff (keep it in a pot buried in the soil to prevent it from taking over).
- Parsley: Loves the richer, moister soil at the base.
- Chives: Thrive in the cooler, lower sections.
Tips from Experienced Gardeners
Thermal Mass Advantage
Use heavy stones if possible. Stones act as thermal mass, absorbing heat during the day and radiating it back to the plants at night. This can actually extend your growing season by a few weeks in the fall.
Vertical Interest
Don’t be afraid to let some plants trail over the edges. Prostrate rosemary or nasturtiums look stunning spilling over stone walls, and it maximizes your growing space even further.
Common Mistakes to Avoid
Building Too Big
If your spiral is more than six feet wide, you won’t be able to reach the center to harvest without stepping on the structure. Keep it within arm’s reach from all sides.
Ignoring Soil Compaction
As you fill the spiral, don’t just dump soil in. Lightly tamp it down. If you don’t, the first heavy rain will cause the soil to sink, leaving your plants’ roots exposed or the structure unstable.
Poor Drainage at the Base
If your soil is heavy clay, ensure the very bottom of the spiral has a way for excess water to exit, or you’ll end up with a stagnant puddle that rots your parsley roots.
Tools and Materials Needed
To get the job done efficiently, gather these items before you start:
- Shovel and spade.
- Wheelbarrow for moving soil and rocks.
- Level (to ensure your base is relatively flat).
- Cardboard or newspaper (for weed suppression).
- Approximately 1 to 2 cubic yards of soil/compost mix.
- Building material (approx. 50-80 medium-sized stones).
Seasonal and Climate Considerations
In hot climates, position your spiral so the “shade side” gets relief from the intense afternoon sun. In colder climates, the thermal mass of the rocks is your best friend. In the winter, you can even drape burlap or frost cloth over the entire structure easily because of its compact shape, protecting your perennial herbs from deep freezes.
Benefits of This Gardening Method
The primary benefit is efficiency. You are essentially folding a 20-foot linear garden bed into a 5-foot circle. It also saves water; as you water the top, the excess moisture trickles down to the plants that need it most at the bottom. Furthermore, it creates a stunning focal point in any landscape, proving that food production can be beautiful.
Alternative Methods
If stone-stacking isn’t for you, consider these variations:
- Gabion Spirals: Use wire mesh baskets filled with small rocks.
- Timber Spirals: Use short lengths of pressure-treated 4x4s set vertically.
- Straw Bale Spirals: A temporary version that eventually composts down into rich soil.
Conclusion
Creating a herb spiral garden is one of the most effective ways to boost your culinary independence while adding a touch of artistry to your yard. By understanding how to manipulate elevation and drainage, you can grow a diverse array of flavors in a very small area. Taking the time to build a diy herb spiral ensures that you have fresh, organic ingredients at your fingertips for years to come. Whether you’re harvesting sage for a holiday roast or mint for a refreshing summer tea, your spiral will stand as a testament to smart, sustainable gardening.
Frequently Asked Questions
How long does it take to build?
For a beginner, the entire process—from clearing the ground to planting the last herb—usually takes about 4 to 6 hours of work.
Do I need mortar for the stones?
No, a dry-stack method is preferred. This allows for better drainage and lets you tuck small plants like sedums or thyme directly into the cracks between the stones.
Can I build this on a patio?
Yes, but you will need a solid base (like a heavy-duty pond liner) and a way to manage drainage so water doesn’t pool on your hardscaping.
Which herbs should I avoid?
Avoid extremely large shrubs like full-sized Bay Laurel or invasive plants that spread via deep underground runners, as they can eventually de-stabilize the stone structure.
How often should I water?
Watering depends on your climate, but generally, you should water the top section more frequently. The water will naturally migrate to the bottom, keeping the entire system hydrated.



