
A Beginner’s Guide to a Bountiful Spud Harvest: Your Spring Gardening Roadmap
There is a unique kind of magic that happens when you dig into the cool, damp earth and pull out a cluster of golden nuggets. For many of us, the true start of the gardening season isn’t the first flower; it’s the day we commit to planting potatoes spring rituals. Whether you have a sprawling backyard or just a few patio containers, learning to grow potatoes is one of the most rewarding projects a gardener can undertake. Not only are homegrown tubers far more flavorful than their grocery store counterparts, but the process itself is deeply satisfying and surprisingly simple if you know the right steps.
Preparing Your Potatoes for the Soil
Choosing the Right Seed Potatoes
Before you stick anything in the ground, you need to start with high-quality “seed potatoes.” Contrary to what the name suggests, these aren’t tiny seeds, but rather small tubers or pieces of a larger potato. Avoid using potatoes from the supermarket, as they are often treated with growth inhibitors to prevent sprouting. Instead, visit a local nursery or order certified disease-free seed potatoes online. You can choose from “Early” varieties (fast growing), “Maincrop” (better for storage), or “Second Earlies.”
The Art of Chitting
“Chitting” is simply the process of encouraging the potatoes to grow sprouts before they are planted. Place your seed potatoes in an egg carton or a shallow tray with the “eyes” (the small indentations) facing upward. Keep them in a cool, bright spot—but out of direct sunlight—for about 2–4 weeks. You’ll know they are ready when they have sturdy, green or purple shoots about an inch long. This head start is especially helpful in shorter growing seasons.
Setting Up Your Garden for Success
Sunlight and Soil Requirements
Potatoes are sun-lovers. They require at least 6 to 8 hours of direct sunlight every day to produce a healthy crop. The soil is equally important; it should be loose, well-draining, and slightly acidic (a pH of 5.0 to 6.0 is ideal). If your soil is heavy clay, the tubers will struggle to expand. Incorporating plenty of well-rotted compost or aged manure will give them the nutrients and texture they crave.
Timing Your Planting Perfectly
The best time to start is usually 2 to 4 weeks before the last expected frost in your area. You want the soil to be workable and at least 45°F (7°C). If the soil is too cold and wet, the seed potatoes may rot before they ever get the chance to grow. Keep an eye on your local weather forecast—if a surprise hard freeze is predicted after your sprouts have emerged, be prepared to cover them with some straw or a frost blanket.
Your Step-By-Step Guide to Success
When you are finally ready to begin planting potatoes spring style, follow these simple steps to ensure a healthy harvest. This method, often called the “trenching method,” is the gold standard for anyone looking to grow potatoes in traditional garden beds.
Step 1: Slice and Prep
If your seed potatoes are larger than a golf ball, cut them into pieces. Ensure each piece has at least two “eyes.” Let the cut sides dry out (callous over) for 24 hours before planting to prevent rot.
Step 2: Dig Your Trenches
Dig a trench about 6 inches deep. If you are planting multiple rows, space the trenches about 2 to 3 feet apart. This gives you plenty of room to walk and “hill” the plants later.
Step 3: Placement
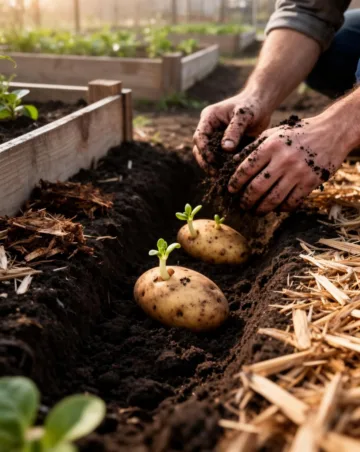
Place your potato pieces into the trench with the sprouts pointing upward. Space them about 12 inches apart.
Step 4: Cover and Water
Cover the potatoes with only 3 or 4 inches of soil. Do not fill the trench all the way to the top yet. Give them a good watering to settle the soil.
Step 5: Hill Up
As the stems grow and reach about 6–8 inches tall, use a hoe to pull extra soil from the sides of the trench up around the stems, leaving only the top few inches of leaves exposed. This process, called “hilling,” protects the developing potatoes from sunlight (which turns them green and toxic) and encourages more tubers to grow along the buried stem.
Tips from Experienced Gardeners
Mulch is Your Best Friend
Once you have finished hilling your plants, apply a thick layer of straw or shredded leaves. Mulch helps retain moisture, suppresses weeds, and keeps the soil temperature consistent during those unexpected late-spring heatwaves.
Watering Consistency
Potatoes need consistent moisture, especially when they are flowering. This is the period when the tubers are actively forming. If the soil dries out completely and then gets soaked, your potatoes might develop “hollow heart” or become misshapen. Aim for about an inch of water per week.
Common Mistakes to Avoid
Don’t Over-Fertilize with Nitrogen
While it’s tempting to dump fertilizer on your garden, too much nitrogen will give you lush, beautiful green leaves but very tiny potatoes. Focus on a balanced fertilizer or one slightly higher in phosphorus and potassium.
Avoid Sunlight Exposure
If you see a potato peeking out of the soil, cover it immediately. Exposure to light causes the potato to produce chlorophyll and solanine. Solanine is bitter and can make you sick if consumed in large quantities.
Planting Too Deep Initially
While potatoes need a lot of soil over them eventually, planting them 10 inches deep at the very start can cause the seed piece to struggle or rot before it reaches the surface. Start shallow and build the soil up.
Tools and Materials Needed
To get the job done right, gather these items before you head out to the garden:
- Certified seed potatoes: The foundation of your crop.
- Hand trowel or garden spade: For digging trenches.
- Garden hoe: Essential for the hilling process.
- Organic compost: To enrich the soil.
- Balanced organic fertilizer: (Look for a 5-10-10 NPK ratio).
- Straw or mulch: To protect the soil and conserve moisture.
Seasonal and Climate Considerations
Your regional climate plays a big role in your success. In cooler northern climates, you might only get one long growing season. In warmer southern climates, gardeners often plant a crop in very early spring and another in late summer for a fall harvest. If you live in an area with very wet springs, consider planting in raised beds. Raised beds allow for better drainage, preventing the “wet feet” that lead to potato rot.
Benefits of Growing Your Own Potatoes
The most obvious benefit is flavor. Freshly dug potatoes have a creamy texture and a sweet, earthy taste that disappears once they have been sitting in a warehouse for months. Additionally, growing your own allows you to try heirloom varieties—like ‘Purple Majesty’ or ‘French Fingerling’—that you will rarely find in a standard supermarket. It’s also a fantastic way to involve children in gardening; digging for potatoes is like a literal treasure hunt in the dirt.
Alternative Methods for Small Spaces
Potato Bags and Containers
If you don’t have a large garden plot, “grow bags” are a fantastic alternative. These are heavy-duty fabric bags that allow for excellent aeration. You start with just a few inches of soil at the bottom and gradually add more as the plant grows, mimicng the hilling process in a confined space.
The No-Dig Straw Method
For those who want to save their backs, you can plant potatoes directly on top of loosened soil and cover them with 12 inches of loose straw instead of dirt. As the plant grows, you simply add more straw. At harvest time, there is no digging required—you just pull back the straw and grab your clean potatoes.
Conclusion
Embarking on the journey of planting potatoes spring after spring is a tradition that connects gardeners to the rhythm of the seasons. It requires a bit of patience and some physical effort during the hilling phase, but the reward of a cellar full of organic, delicious tubers is well worth it. By selecting the right varieties, preparing your soil with care, and staying consistent with moisture, you will find that anyone can successfully grow potatoes regardless of their experience level. So, grab your spade, get your hands dirty, and enjoy the incredible satisfaction of harvesting your own homegrown food.
Frequently Asked Questions
How do I know when my potatoes are ready to harvest?
For “new” potatoes (small, tender ones), you can harvest a few weeks after the plant finishes flowering. For full-sized storage potatoes, wait until the foliage turns yellow and dies back completely.
Can I plant a potato that has sprouted in my kitchen cupboard?
Technically yes, but it isn’t recommended. Grocery store potatoes are often treated to stay dormant longer and may carry diseases that can linger in your garden soil for years.
Why did my potato plants grow flowers?
Flowering is a natural part of the plant’s life cycle! It usually signals that the plant has begun forming tubers underground. You don’t need to do anything with the flowers; just let them bloom and fade naturally.
What are the best companion plants for potatoes?
Potatoes grow well near beans, corn, and members of the cabbage family. However, avoid planting them near tomatoes, peppers, or eggplants, as they are part of the same family and can share the same diseases and pests.
How should I store my potatoes after harvest?
Brush off the excess dirt (don’t wash them until you’re ready to eat) and let them “cure” in a cool, dark, well-ventilated place for about two weeks. This toughens the skins for long-term storage. After curing, keep them in a dark spot around 40-45°F.



