
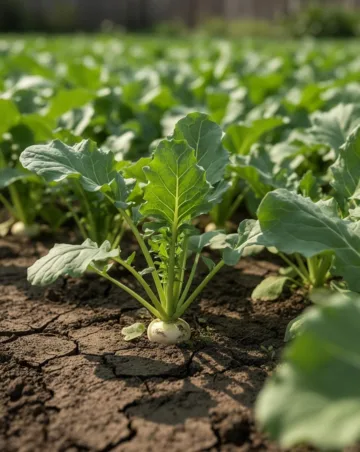
The Humble Superfood: Why Every Home Garden Needs Turnips
There is a certain magic in pulling a crisp, purple-topped root from the cool autumn earth. For many years, turnips were unfairly labeled as “peasant food” or boring survival crops, but modern gardeners are reclaiming this versatile vegetable. Whether you are looking for zesty greens for a sauté or sweet, creamy roots for a winter roast, learning how to grow turnips is one of the most rewarding projects you can undertake. This turnip planting guide will walk you through everything from soil preparation to the final harvest, ensuring your backyard bounty is both delicious and plentiful.
Understanding the Basics of Turnip Horticulture
Turnips (Brassica rapa) belong to the cruciferous family, making them cousins to broccoli, kale, and cabbage. They are incredibly fast-growing, with some varieties reaching maturity in as little as 35 days.
Choosing the Right Variety
Before you dig your first hole, you need to decide what you want from your crop. Some varieties, like ‘Purple Top White Globe’, are classic dual-purpose types grown for both roots and greens. Others, like ‘Seven Top’, are strictly grown for their peppery foliage. If you prefer a delicate, salad-style root, look for Japanese ‘Hakurei’ turnips, which are so sweet they can be eaten raw like an apple.
The Ideal Climate for Growth
Turnips are cool-weather specialists. They thrive when temperatures are between 40°F and 75°F. In most regions, this means planting in early spring for a summer harvest or late summer for an autumn crop. The flavor of the root actually improves after a light frost, as the plant converts starches into sugars to protect itself from freezing.
Preparing Your Garden Bed
Success starts beneath the surface. Because turnips are root crops, they require loose, well-draining soil to expand without resistance.
Soil Composition and pH
Aim for a sandy loam soil with a pH between 6.0 and 7.5. If your soil is heavy clay, the roots may become misshapen or stunted. Incorporating aged compost or well-rotted manure a few weeks before planting will provide the necessary nutrients without the risks associated with high-nitrogen chemical fertilizers, which can encourage leaf growth at the expense of the root.
Sunlight Requirements
Turnips are relatively flexible but prefer full sun (at least 6 hours a day). If you live in a particularly warm climate, providing some afternoon shade can help prevent the plants from bolting—which is when they prematurely produce seeds and the roots become woody and bitter.
Your Complete turnip planting guide to Success
If you follow a systematic approach, you will find it surprisingly easy to grow turnips in almost any garden setup, from raised beds to traditional rows.
Step 1: Timing the Planting
For a spring crop, sow seeds 2 to 3 weeks before the last expected frost. For a fall harvest, sow seeds in late summer, roughly 6 to 8 weeks before the first hard frost of winter.
Step 2: Sowing the Seeds
Turnip seeds are tiny, so it is easiest to sow them shallowly. Plant seeds about 1/4 to 1/2 inch deep. If planting in rows, space the rows 12 to 18 inches apart. You can also “broadcast” the seeds (scatter them) over a wide bed for a dense patch of greens.
Step 3: Thinning for Root Growth
As the seedlings reach 3 or 4 inches in height, you must thin them. Crowded turnips will not develop large bulbs. Space them 4 to 6 inches apart for large roots. Don’t throw away the thinnings! These “micro-turnips” are delicious in salads or lightly steamed.
Step 4: Consistent Moisture
Watering is the most critical part of the maintenance phase. Turnips need about an inch of water per week. Inconsistent watering leads to “checking,” which causes the roots to become tough and overly pungent.
Expert Tips for a Better Harvest
Experienced gardeners often have a few “secret” tricks to maximize their yields.
Mulching for Temperature Control
Apply a layer of straw or shredded leaves around the base of the plants once they are established. This keeps the soil cool and moist, which prevents the roots from becoming fibrous during unexpected warm spells.
Succession Planting
Don’t plant all your seeds at once. Sow a new batch every two through three weeks. This ensures a continuous harvest throughout the season rather than a massive surplus that expires all at once.
Common Mistakes to Avoid
Waiting Too Long to Harvest
The most common mistake is letting turnips get too big. Standard varieties are best harvested when they are the size of a tennis ball. If they grow much larger, they often develop a pithy, spongy texture that is unpleasant to eat.
Over-Fertilizing with Nitrogen
While nitrogen is great for kale, too much of it will give you massive turnip greens but tiny, shriveled roots. Use a balanced fertilizer (like a 10-10-10) or simply rely on high-quality compost.
Ignoring Pests
Flea beetles are the primary nemesis of the turnip. They leave tiny “shotholes” in the leaves. While a healthy plant can survive some damage, young seedlings can be killed. Using row covers (lightweight mesh fabrics) immediately after sowing is the best organic defense.
Tools and Materials Needed
To get started, you don’t need expensive machinery. A basic gardening kit will suffice:
- A Garden Fork: For loosening the soil and breaking up clods.
- High-Quality Seeds: Choose a variety suited for your goals (greens vs. roots).
- Organic Compost: To enrich the soil and improve drainage.
- A Rake: To create a smooth, level seedbed.
- Hand Trowel: For thinning and harvesting.
- Lightweight Row Covers: To protect against pests like cabbage maggots and flea beetles.
Seasonal and Climate Considerations
Your geographical location dictates your strategy. In USDA zones 8 and above, turnips can often be grown as a winter crop. In colder northern climates (zones 3–6), the window is much tighter, making the spring and fall “shoulders” of the season your primary focus.
The “Sweet” Fall Harvest
If you are gardening in a region with cold winters, the fall crop is usually superior. The dropping temperatures of October and November increase the sugar content of the roots, making them taste almost like radishes but with a buttery finish.
Benefits of Growing Turnips
Why choose turnips over more popular vegetables like carrots or potatoes?
- Speed: They are one of the fastest “root to table” crops available.
- Nutrition: They are high in Vitamin C, fiber, and potassium. The greens are even more nutrient-dense than the roots, packed with Vitamins A and K.
- Low Maintenance: They have few disease issues compared to tomatoes or peppers.
- Versatility: You can roast, mash, pickle, or eat them raw.
Alternative Growing Methods
If you don’t have a large backyard, don’t worry. Turnips are highly adaptable.
Container Gardening
Many gardeners find success growing smaller turnip varieties in containers. A pot that is at least 12 inches deep and wide can easily support 3 to 4 plants. Use a high-quality potting mix rather than garden soil to ensure adequate drainage.
Raised Beds
Raised beds are ideal for root vegetables. Because the soil in a raised bed is never stepped on, it remains light and airy. This allows the turnip bulb to expand uniformly, resulting in perfectly round, attractive roots.
The Joy of Growing Your Own Produce
Entering the world of root vegetables is a journey of discovery. When you grow turnips, you aren’t just adding a side dish to your dinner table; you are engaging in a centuries-old tradition of self-sufficiency and seasonal eating. By following this turnip planting guide, you have the tools to transform a handful of tiny seeds into a bountiful, nutrient-rich harvest. Whether you are sautéing the peppery greens or mashing the creamy roots with butter and salt, the flavor of a homegrown turnip is incomparable to anything you will find in a grocery store. Happy planting!
Frequently Asked Questions
1. Can I grow turnips in the shade?
While they prefer full sun, turnips can tolerate partial shade, especially if you are primarily growing them for their greens. However, for large, healthy roots, at least 6 hours of sunlight is recommended.
2. How do I know when my turnips are ready to harvest?
You can usually see the “shoulders” of the turnip popping out of the soil. For most varieties, harvest when the root is 2 to 3 inches in diameter. You can also harvest “baby” turnips at 1 inch for a very mild flavor.
3. Why are my turnips so spicy/hot?
Turnips usually become overly pungent due to heat stress or lack of water. If the soil dries out completely or the weather gets too hot, the plant produces compounds that make the root taste sharp and bitter.
4. Can you eat turnip greens raw?
Yes! Young, tender turnip greens are excellent in salads. Older, larger leaves are better when sautéed or boiled with a bit of bacon or lemon juice to mellow their spicy bite.
5. How should I store my harvested turnips?
Remove the greens immediately after harvesting (leave about an inch of stem). The greens will last a few days in the fridge. The roots can be stored in a perforated plastic bag in the crisper drawer for 2 to 3 weeks, or in a cool root cellar for several months.



