
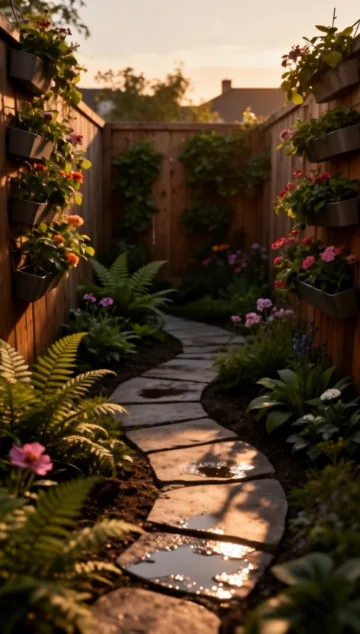
Transform Your Backyard: Creative Ways to Level Up Your Outdoor Experience
There is something inherently magical about a path that winds through a lush garden. It isn’t just about getting from point A to point B; it’s about the journey, the discovery of a blooming rose bush, or the quiet moment spent walking toward a backyard seating area. Whether you are dealing with a muddy patch of grass or you want to add structure to a sprawling lawn, exploring different garden path ideas can completely redefine your outdoor aesthetic. A well-executed garden walkway design doesn’t just improve your home’s curb appeal; it protects your precious plants from foot traffic and keeps your shoes clean during the rainy season. In this guide, we will explore materials, techniques, and styles that suit every budget and skill level.
Choosing the Right Style for Your Space
The Rustic Charm of Natural Stone
Natural stone is a perennial favorite for gardeners who want a look that blends seamlessly with the environment. Flagstone, slate, and fieldstone offer irregular shapes that create a “cottage core” aesthetic. Because these stones come in earthy tones—tans, grays, and muted blues—they complement almost any floral palette. You can plant low-growing herbs like creeping thyme between the stones to release a pleasant aroma every time you step on them.
Modern Minimalism with Concrete Pavers
If your home has a contemporary architectural style, sleek concrete pavers might be the way to go. You can find them in perfect squares or long rectangles. By spacing them evenly and filling the gaps with dark basalt pea gravel or white river rocks, you create a high-contrast, clean look that feels sophisticated and orderly.
Eco-Friendly Wood and Mulch
For a woodland garden or a more casual backyard, wood rounds (cross-sections of logs) or simple bark mulch paths are excellent choices. They are soft underfoot and incredibly affordable. Wood paths breathe and allow water to permeate the soil, which is great for the overall health of your garden ecosystem. However, keep in mind that organic materials like mulch will need to be topped off every year or two as they decompose.
Creative Material Combinations
Brick and Cobblestone Tradition
Nothing says “timeless” quite like a herringbone brick path. Bricks are durable, easy to source, and provide a non-slip surface even when wet. If you live in an older home, using reclaimed bricks can add a sense of history and character to your landscaping. Cobblestones, while slightly more uneven, offer an old-world European charm that works beautifully near herb gardens or rose arbors.
Gravel and Polished Pebbles
Gravel is perhaps the most versatile and DIY-friendly material. It’s inexpensive and provides excellent drainage. To keep it looking neat, use a sturdy edging material like metal, plastic, or even a line of upturned wine bottles. For a more tactile experience, choose “pea gravel” (small, rounded stones) rather than crushed rock, as it is much more comfortable for those who like to garden barefoot.
Step-by-Step Instructions for Your DIY Project
Building a path is one of the most rewarding weekend projects a hobbyist can undertake. To ensure your garden path ideas stand the test of time, you need to focus on the foundation. A poorly laid garden walkway design will eventually shift, sag, or become overtaken by weeds, so follow these steps carefully.
Step 1: Planning and Marking
Use a garden hose or a long rope to map out the shape of your path. Curves look more natural and inviting than straight lines. Once you are happy with the layout, use landscape spray paint to mark the edges.
Step 2: Excavation
Dig out the marked area to a depth of about 4 to 6 inches, depending on your material. For a gravel or mulch path, 4 inches is usually plenty. For heavy pavers or bricks, you may need a bit more depth to accommodate a base layer of sand or crushed stone.
Step 3: Laying the Landscape Fabric
This is a crucial step that many beginners skip. Lay down a high-quality, woven landscape fabric. This prevents weeds from poking through your beautiful new path while still allowing water to drain into the earth.
Step 4: Setting the Base and Edging
Install your edging first to keep the materials contained. Then, add a 2-inch layer of compactable gravel (often called “crushed minus”). Tamp it down until it is firm and level. If you are laying pavers, add a 1-inch layer of leveling sand on top of the gravel.
Step 5: Placing the Surface Material
Lay your stones, bricks, or pour your gravel. If using pavers, leave a small gap (about 1/8 inch) between them, then sweep polymeric sand into the cracks. Wet the sand with a light mist; it will harden and lock the stones in place.
Tips from Experienced Gardeners
- Lighting is Key: Don’t forget to light your path. Solar-powered LED stakes are an easy way to ensure safety at night without needing an electrician.
- Think About Width: Make your main paths at least 3 feet wide. This allows two people to walk side-by-side or gives you enough room to maneuver a wheelbarrow comfortably.
- Plant “Step-ables”: In the gaps between stones, plant varieties like Sedum sarmentosum or Irish Moss. They are resilient and add a lush, green “living” element to the hardscape.
- The Rain Test: Before finalizing your path, watch where water pools during a heavy rain. Adjust your leveling to ensure water flows away from your home’s foundation.
Common Mistakes to Avoid
One of the biggest mistakes is failing to use a proper base. Simply laying stones on top of dirt will lead to an uneven surface within a single season. Another common error is choosing materials that are too slick. Polished marble might look beautiful, but it becomes a skating rink when it rains or frosts. Always prioritize “grip” for safety. Lastly, avoid making the path too narrow. A path that is only 1 foot wide feels cramped and is often avoided by guests.
Tools and Materials Needed
Before you head to the garden center, make sure you have the following basics:
- Shovel and spade
- Wheelbarrow (for moving heavy soil and stones)
- Rake (for leveling gravel)
- Hand tamper or plate compactor
- Spirit level (to ensure the path isn’t tilted)
- Landscape fabric and u-shaped staples
- Tape measure and marking paint
- Gloves and safety glasses
Seasonal and Climate Considerations
Your climate should dictate your material choice. In regions with heavy “freeze-thaw” cycles, avoid large slabs of poured concrete, as they are prone to cracking. Instead, use individual pavers or gravel which can shift slightly with the ground without breaking. In very hot, dry climates, dark stones can absorb a lot of heat; opt for lighter-colored gravels like “Arizona Gold” or light tan stones to keep the area cooler for your feet and your plants.
Benefits of a Structured Path
Beyond the obvious aesthetic appeal, a garden path serves several functional purposes:
- Soil Health: By keeping feet on a designated path, you prevent soil compaction in your planting beds, which allows roots to breathe and water to reach them more easily.
- Cleanliness: A path means less mud tracked into your home after a morning of deadheading flowers or harvesting veggies.
- Organization: Paths create “rooms” in your garden, helping you separate a vegetable plot from a play area or a meditation corner.
Alternative Methods
If a permanent stone path feels like too much work, consider “stepping stones” placed directly into the lawn. Simply cut out a piece of sod the size of the stone, drop the stone in so it sits slightly below the grass level, and you can mow right over it. Another low-cost alternative is using recycled wooden pallets. You can disassemble the pallets and lay the slats down like a boardwalk for a rustic, reclaimed look.
Conclusion
Creating a beautiful walkway is one of the most transformative things you can do for your outdoor space. Whether you opt for the elegance of flagstone or the simplicity of bark mulch, the best garden path ideas are those that reflect your personal style and meet the practical needs of your landscape. By taking the time to plan your garden walkway design, choosing durable materials, and following the proper installation steps, you ensure that your garden remains a functional and inviting sanctuary for years to come. Now, grab your shovel and start carving out your new favorite route through the greenery!
Frequently Asked Questions
How much does it cost to build a garden path?
The cost varies wildly. A simple mulch path can cost as little as $1 per square foot, while a professionally installed flagstone or brick path can range from $15 to $30 per square foot depending on the stone quality.
What is the best material for a low-maintenance path?
Gravel is generally the lowest maintenance if you use a high-quality landscape fabric underneath. It drains perfectly and requires only an occasional raking to keep it level.
Can I build a path on a slope?
Yes, but you may need to incorporate “steps” or “timber tiers” to prevent the materials from washing away. For slight inclines, use crushed rock with jagged edges, as these lock together better than rounded pebbles.
How do I keep grass from growing in my path?
Using a thick layer of landscape fabric (gardeners’ grade) is the first defense. For paved paths, using polymeric sand in the joints creates a hard seal that seeds cannot penetrate.
What width should a garden path be?
For a secondary path (like one leading to a compost bin), 18-24 inches is sufficient. For a primary walkway leading to a front door or main patio, aim for 36-48 inches.



