
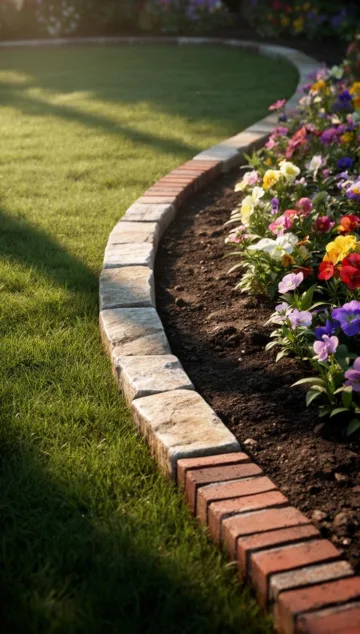
10 Creative Ways to Define Your Landscape: A Guide to Beautiful Borders
Every passionate gardener knows that a beautiful backyard is more than just a collection of vibrant flowers and lush shrubs. It is about structure, clean lines, and the way different spaces interact with one another. Think of your garden as a piece of art; even the most stunning painting looks unfinished without the right frame. Choosing the right garden edging ideas can transform a messy patch of grass into a professional-looking sanctuary. Not only does it provide a visual boundary, but smart garden border ideas also serve a functional purpose by keeping mulch in its place and preventing aggressive grass from creeping into your precious flower beds.
The Best Materials for Every Garden Style
Selecting the right material is the first step in your landscaping journey. The material you choose should complement your home’s architecture and your personal gardening style.
Natural Stone and Cobblestones
For those who love a rustic or traditional English cottage look, natural stone is unbeatable. You can use fieldstones found in your own backyard or purchase uniform cobblestones from a local nursery. Stone is incredibly durable and ages beautifully, developing a mossy patina over time that blends seamlessly with nature.
Brick and Masonry
Brick is a classic choice for a reason. It is versatile, easy to install, and provides a formal, timeless feel. You can lay bricks flat, on their side, or even at an angle for a “sawtooth” effect. Red clay bricks pop beautifully against green foliage, making them a favorite for many suburban landscapes.
Wood and Timber
Pressure-treated lumber, cedar, or even landscape timbers offer a clean, linear look. These are ideal for raised beds or modern, minimalist gardens. While wood does eventually rot, it is an affordable and accessible option for beginners who want to see immediate results.
Metal and Steel Edging
If you prefer a “barely there” look, thin steel or aluminum edging is the way to go. It creates incredibly sharp lines and is flexible enough to handle curves and circles around trees. Corten steel, which develops a protective layer of rust, is currently trending for its industrial-chic aesthetic.
Step-by-Step Instructions: Installing Your Edge Like a Pro
Installing your own edging doesn’t require a degree in landscape architecture. By following a simple process, you can implement your favorite garden edging ideas in a single weekend. A well-executed plan ensures that your garden border ideas remain stable through heavy rain and changing temperatures.
- Mark the Perimeter: Use a garden hose or a long rope to map out the shape of your bed. This allows you to visualize the curves before you start digging. Use marking spray paint to finalize the line.
- Cut the Trench: Using a sharp spade or a half-moon edger, cut vertically along your marked line. Aim for a depth of about 4 to 6 inches, depending on your material.
- Remove the Sod: Lift out the grass and soil from the trench. Ensure the bottom of the trench is level and firm.
- Lay a Base (Optional): For heavy materials like stone or brick, adding an inch of leveled sand or crushed gravel helps prevent shifting over time.
- Set the Material: Place your edging material into the trench. If using bricks or stones, use a rubber mallet to tap them into place so they are flush with the ground (this makes mowing much easier!).
- Backfill and Secure: Fill any gaps with soil or mulch and pack it down firmly to hold the edge in place.
Tips from Experienced Gardeners
Over the years, seasoned horticulturalists have learned a few tricks to make edging more effective. One of the best pieces of advice is the “Mower’s Edge” technique. This involves setting your edging materials slightly below or exactly at the level of the soil. This allows you to run the wheels of your lawnmower directly over the edge, eliminating the need for string trimming later.
Another tip is to consider the “Spade Edge.” This is a trench-only method where you don’t use any physical material at all. By maintaining a sharp, 90-degree drop between the grass and the mulch, you create a professional look that is free and easy to change next season.
Common Mistakes to Avoid
- Installing Too High: If your edging sticks up too far, it becomes a tripping hazard and makes lawn maintenance a nightmare.
- Ignoring Drainage: Solid edging can sometimes act as a dam, trapping water in your flower beds. Ensure there are slight gaps or a natural slope to allow excess water to escape.
- Neglecting Weed Barriers: Even with a great edge, grass roots (rhizomes) can dive under shallow borders. Ensure your trench is deep enough to discourage these underground invaders.
Tools and Materials Needed
Before you head to the garden center, make sure you have these essentials in your shed:
- Square-point spade: For cutting clean vertical lines.
- Half-moon edger: Specifically designed for curved borders.
- Rubber mallet: To set stones without cracking them.
- Level: To ensure your bricks or timbers aren’t slanted.
- Gardening gloves: To protect your hands from blisters and rough stones.
- Landscape fabric: Optional, but helpful in preventing weeds along the border line.
Seasonal and Climate Considerations
Your climate plays a huge role in how your edging performs. In regions with “frost heave” (where the ground freezes and thaws), heavy materials like brick and stone can shift and become uneven over the winter. If you live in a cold climate, a deeper base of crushed gravel is essential.
In humid or rainy areas, wooden edging may rot faster. In these environments, choosing rot-resistant cedar or treated pine is a better investment. Conversely, in very hot, arid climates, plastic edging may become brittle and crack under intense UV rays, making metal or stone a superior long-term choice.
Benefits of Defining Your Garden Borders
Why bother with edging at all? Beyond the obvious “curb appeal,” there are several biological and practical benefits:
- Nutrient Retention: Edging keeps your nutrient-rich mulch and compost inside the bed where your plants need it, rather than washing away onto the sidewalk.
- Root Management: It provides a physical barrier that prevents aggressive turf grass from stealing water and nutrients from your perennials.
- Visual Organization: It draws the eye to specific focal points, such as a prize-winning rose bush or a beautiful water feature.
Alternative Methods: Thinking Outside the Box
If traditional materials don’t excite you, consider some “upcycled” options. Some gardeners use inverted wine bottles buried halfway into the ground for a colorful, bohemian look. Others use large seashells, terracotta pot shards, or even thick sections of nautical rope pinned down with landscape staples. These unconventional methods add character and tell a story about the gardener’s personality.
Conclusion
Defining the boundaries of your landscape is one of the most rewarding DIY projects a hobbyist can undertake. By exploring different garden edging ideas, you can find a style that fits both your budget and your home’s aesthetic. Whether you choose the permanence of stone or the flexibility of a hand-dug trench, these garden border ideas will help keep your outdoor space tidy, healthy, and visually striking for years to come. Remember, gardening is a journey—don’t be afraid to experiment with different materials until you find the perfect frame for your backyard masterpiece.
Frequently Asked Questions
What is the cheapest way to edge a garden?
The most budget-friendly method is the “Victorian Trench” or spade edge. It requires no materials at all—just a sharp shovel and a bit of manual labor to cut a clean line between the grass and the flower bed.
How deep should garden edging go?
To effectively stop grass roots from creeping into your beds, aim for a depth of 4 to 6 inches. Most turf grass roots stay in the top few inches of soil, so a 6-inch barrier is usually sufficient.
Does edging prevent weeds?
While it won’t stop airborne weed seeds from landing in your garden, it does prevent “creeping” weeds and grass from invading from the lawn side. It also keeps mulch contained, which is your primary defense against weeds.
Can I use treated wood for vegetable garden edging?
Modern pressure-treated lumber (labeled ACQ) is generally considered safe for garden use, as it no longer contains arsenic. However, many organic gardeners still prefer naturally rot-resistant woods like Cedar or Redwood just to be safe.
How do I keep my edging lines straight?
The best trick is to use a “string line.” Stake two points and pull a string tight between them. Follow the string with your spade to ensure your edge is perfectly straight over long distances.



