
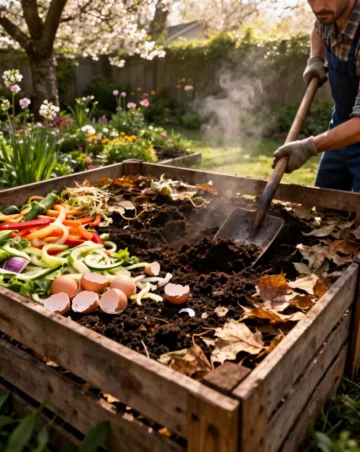
Turning Scraps into Soil: The Ultimate Guide to Garden Gold
Have you ever looked at your kitchen scraps—the onion skins, coffee grounds, and wilted lettuce—and felt a pang of guilt for tossing them in the trash? You aren’t alone. For many home gardeners, the transition from disposing of waste to recycling it is a rite of passage. Embracing composting for beginners is one of the most impactful things you can do for your soil health and the planet. When you start compost bin systems in your backyard, you move away from being a consumer and become a producer of “black gold,” the rich, dark organic matter that makes vegetables thrive and flowers pop. In this guide, we will break down the science of rot into simple, actionable steps that anyone can master.
The Basics: What Exactly is Compost?
At its heart, composting is just nature’s way of recycling. It is the biological process of breaking down organic matter—like leaves and food scraps—into a nutrient-rich soil amendment. Microorganisms, fungi, and insects do the heavy lifting, turning your waste into a crumbly, earthy-smelling substance that improves soil structure and provides a slow-release source of nutrients.
Aerobic vs. Anaerobic Decomposition
Most home gardeners aim for aerobic composting. This process uses oxygen to help beneficial bacteria break down materials quickly without the foul smells often associated with rot. Anaerobic composting happens without oxygen (like in a sealed landfill) and tends to produce methane and unpleasant odors. By keeping your pile aerated, you ensure a healthy, sweet-smelling environment for your garden helper microbes.
The Carbon-to-Nitrogen Ratio
To succeed, you need a balance of “Browns” and “Greens.” Browns are carbon-rich materials like dried leaves, straw, and cardboard. They provide the energy for the microbes. Greens are nitrogen-rich materials like fruit peels, fresh grass clippings, and coffee grounds. They provide the protein needed for the microbes to grow and multiply. A good rule of thumb for composting for beginners is a ratio of roughly three parts brown to one part green by volume.
Choosing Your Setup: Where to Start
Before you toss your first banana peel, you need to decide where your compost will live. Your choice depends on your space, your aesthetic preferences, and how much “work” you want to put in.
Stationary Bins and Heaps
A simple wooden crate or a plastic bin with an open bottom is a classic choice. These are great because they allow worms and soil microbes to travel easily from the ground into your pile. If you have plenty of room, a simple pile in the corner of the yard works just as well, though it may look a bit untidy to the neighbors.
Tumbling Composters
If you have a small backyard or want to speed up the process, a tumbler is a fantastic option. These are sealed containers that you can rotate with a handle. This makes aeration incredibly easy and keeps pests like raccoons or rodents out of your kitchen scraps.
Your Journey Begins: Step-by-Step Instructions
Ready to get your hands dirty? Follow these steps to start compost bin management and ensure you are practicing composting for beginners correctly from day one.
Step 1: Select Your Site
Find a level, well-drained spot. Placing your bin in a sunny area can help the pile stay warm, which speeds up decomposition, but a shady spot is fine as long as you account for slightly slower results.
Step 2: Create a Base Layer
Start with 4 to 6 inches of “browns” like small twigs or straw. This allows for airflow at the bottom of the pile, preventing the base from becoming a soggy, anaerobic mess.
Step 3: Layer Your Materials
Add your nitrogen-rich greens and carbon-rich browns in alternating layers. Think of it like a lasagna. After every few inches of food scraps, cover them with a layer of dried leaves or shredded paper. This helps prevent flies and keeps the pile balanced.
Step 4: Keep it Damp
The microbes in your compost need moisture to survive. Your pile should feel like a wrung-out sponge. If it’s too dry, decomposition stops. If it’s too wet, it will smell. Give it a light sprinkle with the hose if it looks parched.
Step 5: Turn the Pile
Every week or two, use a pitchfork or a compost aerator tool to turn the materials. This introduces oxygen, which fuels the “hot” decomposition process. If you’re using a tumbler, give it a few spins every few days.
Tips from Experienced Gardeners
Seasoned pros know a few tricks to make the process smoother. One popular tip is to chop or shred your materials before adding them. The smaller the pieces, the more surface area for bacteria to attack, which means faster soil.
The Power of Coffee
Coffee grounds are a secret weapon. Even though they are brown in color, they are a potent “green” source of nitrogen. Many local coffee shops will give away their used grounds for free—just ask!
Don’t Forget the Water
If you live in a particularly dry climate, keep your compost bin covered with a tarp or a lid. This prevents the moisture from evaporating and keeps the internal temperature high enough to kill weed seeds.
Common Mistakes to Avoid
Even the best gardeners run into trouble occasionally. Here are the most common pitfalls to watch out for:
- Adding Meat or Dairy: These items will attract pests like rats and dogs, and they can create quite a stench as they putrefy. Stick to plant-based scraps.
- Too Many Shady Leaves: If you add a foot-thick layer of matted oak leaves, they will form a waterproof barrier. Always shred thick leaves first.
- Neglecting the Pile: A compost pile is a living ecosystem. If you ignore it for six months, it might just become a dry heap of trash. Regular checks are key.
Tools and Materials Needed
You don’t need expensive equipment to get started, but a few basics make the job much easier:
- Pitchfork or Spading Fork: Essential for turning and aerating the pile.
- Kitchen Caddy: A small, lidded container to keep on your counter for daily scraps.
- Hose with a Sprayer: To maintain the “wrung-out sponge” moisture level.
- Brown Materials: Cardboard, newspaper (non-glossy), dried leaves, and straw.
- Green Materials: Vegetable peels, fruit cores, grass clippings, and green garden prunings.
Seasonal and Climate Considerations
In the heat of summer, your compost will work at lightning speed, but it will also dry out quickly. You may need to water your bin as often as you water your garden plants. In the winter, the biological activity slows down significantly or stops altogether if the pile freezes. Don’t worry—the microbes aren’t dead; they’re just dormant. You can continue adding scraps through the winter, and as soon as the spring thaw arrives, the process will kick back into gear.
Benefits of Composting
Why put in the effort? The benefits are immense. Composting reduces the amount of waste sent to landfills, where organic matter produces harmful methane gas. For your garden, compost acts as a buffer against pH swings, improves moisture retention in sandy soils, and increases drainage in heavy clay soils. It’s a natural fertilizer that won’t burn your plants like synthetic chemicals can.
Alternative Methods
If a backyard bin isn’t for you, there are other ways to recycle your scraps:
Vermicomposting (Worm Bins)
Perfect for apartment dwellers, vermicomposting uses Red Wiggler worms in a small indoor bin to process food waste. The resulting “worm castings” are incredibly nutrient-dense.
Bokashi
This Japanese method uses a fermented bran to “pickle” your food waste—including meat and dairy—in a sealed bucket. Once fermented, the waste is buried in the garden to finish breaking down.
Conclusion
Starting your journey with composting for beginners is one of the most rewarding steps you can take as a gardener. It transforms the way you look at “waste” and provides a sense of connection to the natural cycle of growth and decay. Whether you choose a simple heap or a high-tech tumbler, the key is to start compost bin habits today and remain consistent. Within a few months, you’ll be rewarded with a rich, dark amendment that will make your garden the envy of the neighborhood. Happy composting!
Frequently Asked Questions
How long does it take for compost to be ready?
Depending on the method and the weather, it can take anywhere from 3 months to a full year. Hot composting with frequent turning is much faster than cold, “lazy” composting.
Can I put weeds in my compost?
It’s best to avoid adding weeds that have gone to seed or have invasive root systems (like dandelions or ivy), as home compost piles often don’t get hot enough to kill them.
Why does my compost pile smell like rotten eggs?
This usually means the pile is too wet and has become anaerobic. Turn the pile to add air and mix in more “brown” materials like shredded cardboard to soak up excess moisture.
Can I compost citrus peels and onions?
Yes, in a standard backyard bin, these are perfectly fine. However, if you are vermicomposting (using worms), you should limit these as they can be too acidic for the worms.
What should I do if my compost isn’t heating up?
Typically, this means the pile is too dry, too small, or lacks nitrogen. Try adding more “greens,” watering the pile, or increasing the overall size of the heap to help it retain heat.



