The Ultimate Summer Success Secret: Master the Art of the Southern Star in Your Own Backyard
Why You Should Add Okra to Your Garden This Season
For many gardeners, the arrival of scorching summer heat marks a period of struggle where lettuce wilts and tomatoes stop setting fruit. However, there is one resilient, stunning, and highly productive plant that thrives when the sun is at its fiercest: the Southern star, otherwise known as okra. Whether you are a fan of its unique texture in stews or prefer it crispy and fried, learning how to grow okra is a rewarding journey that adds a tropical flair to your vegetable patch. This okra planting guide will walk you through the nuances of heat-loving horticulture, ensuring that even if you live in a cooler climate, you can reap a bountiful harvest of these elegant green pods.
Understanding the Needs of the Okra Plant
Light and Temperature Requirements
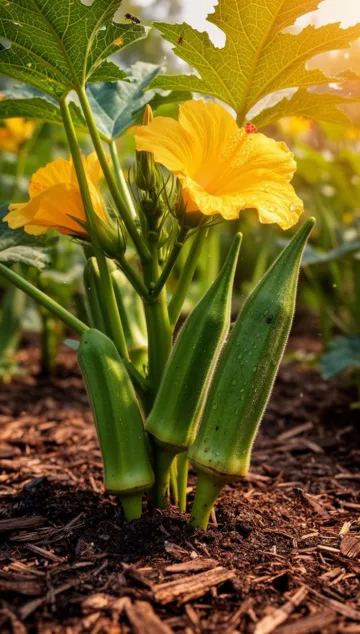
Okra is a relative of the hibiscus and cotton plants, and its beautiful buttery-yellow flowers reflect that heritage. Because of its tropical origins, this plant is a sun-worshiper. To see success, your garden bed needs at least eight hours of direct sunlight daily. Soil temperature is the most critical factor; okra will sulk or rot if the ground is cooler than 65°F (18°C).
Soil Composition and pH
While okra is surprisingly adaptable to different soil types, it performs best in well-drained, fertile soil. Aim for a slightly acidic to neutral pH between 6.5 and 7.0. If you have heavy clay, consider amending it with organic compost or aged manure to improve drainage and aeration, as “wet feet” can lead to root rot.
Choosing the Right Variety for Your Space
Clemson Spineless
This is the gold standard for home gardeners. It is productive, reliable, and as the name suggests, lacks the irritating tiny “spines” that can make harvesting other varieties a prickly chore. It produces uniform, straight pods that stay tender even when they get a bit larger.
Burgundy and Red Varieties
If you want your vegetable garden to double as an ornamental landscape, look into “Red Burgundy” or “Jing Orange.” These varieties feature striking red stems and deep wine-colored pods that look stunning against green foliage. They are as delicious as they are beautiful.
Dwarf Varieties for Containers
For those with limited space, “Baby Bubba” or “Little Lucy” are fantastic dwarf cultivars. They reach only about 2 to 3 feet in height but still produce an impressive amount of fruit, making them perfect for large pots on a patio.
A Complete Step-by-Step Instructions for Success
Starting your journey to a productive harvest requires a bit of patience and timing. Follow this okra planting guide to ensure your seeds germinate quickly and your plants establish a deep, drought-resistant root system. When you decide to grow okra, remember that the goal is consistent warmth from the moment the seed hits the soil.
Step 1: Preparation of the Seeds
Okra seeds have a very tough outer coating. To speed up germination, soak your seeds in room-temperature water for 12 to 24 hours before planting. This softens the shell and signals the embryo to begin waking up.
Step 2: Sowing the Seeds
In most regions, it is best to direct sow okra once the danger of frost has completely passed and the soil is warm. Plant seeds about 1 inch deep and space them 12 to 18 inches apart. If you are planting in rows, keep the rows 3 feet apart to allow for the plant’s wide, branching leaves.
Step 3: Thinning and Initial Care
Once the seedlings reach about 4 inches tall, thin them out so only the strongest plants remain at the recommended spacing. Mulch the area with straw or wood chips to retain moisture and suppress weeds, taking care not to let the mulch touch the plant stems.
Step 4: Consistent Watering and Feeding
While okra is drought-tolerant, it will produce significantly more pods if given an inch of water per week. Side-dress the plants with a balanced organic fertilizer or a layer of compost when they reach about a foot tall, and again when they begin to flower.
Step 5: The Continuous Harvest
Okra grows incredibly fast once it starts flowering. From the time the flower fades, a pod can reach harvestable size in just 2 to 4 days. Pick the pods when they are 2 to 4 inches long. If you let them get too big, they become “woody” and difficult to eat.
Tips from Experienced Gardeners
The “Pruning” Method
In many Southern regions with long growing seasons, gardeners will “stump” their okra in late summer. This involves cutting the tall, lanky plants back to about 6 to 12 inches high. This encourages a fresh flush of growth and a second harvest in the fall before the first frost.
Wear Long Sleeves
Even “spineless” varieties have tiny hairs called glochids that can irritate the skin. Experienced growers always wear gloves and long sleeves when harvesting to avoid the “okra itch.”
Common Mistakes to Avoid
Planting Too Early
The most common mistake is rushing the season. If the soil is cold, the seeds will simply sit and rot. Use a soil thermometer to ensure the ground is at least 65°F. If you must start early, use black plastic mulch to pre-heat the soil for two weeks prior to planting.
Over-Fertilizing with Nitrogen
Too much nitrogen will result in massive, beautiful green plants with lush leaves but very few flowers. Stick to a balanced fertilizer (like a 10-10-10) or compost to ensure the plant focuses its energy on fruit production.
Tools or Materials Needed
- High-quality Okra Seeds: Choose a variety suited to your climate (e.g., short-season varieties for the North).
- Hand Trowel: For digging small planting holes.
- Soil Thermometer: To ensure the ground is warm enough for germination.
- Organic Compost: For soil enrichment and side-dressing.
- Garden Gloves and Pruners: To harvest the pods cleanly without irritating your skin.
- Mulch: Straw, shredded leaves, or wood chips to regulate soil temperature.
Seasonal or Climate Considerations
Gardening in the North
If you live in a zone with short summers, you can still succeed by starting seeds indoors in biodegradable peat pots 4 weeks before the last frost. Be extremely careful when transplanting, as okra has a sensitive taproot that does not like to be disturbed. Using a black plastic ground cover can help keep the roots warm through cooler nights.
Managing High Humidity
In humid regions like the Southeast, okra can be prone to powdery mildew. To prevent this, ensure there is plenty of space between plants for air circulation and avoid overhead watering. Aim the hose at the base of the plant rather than the leaves.
Benefits of Growing Okra
Nutritional Value
Okra is a powerhouse of nutrition. It is high in Vitamin C, Vitamin K, and fiber. It also contains unique antioxidants like polyphenols that support heart and brain health.
Pollinator Magnet
The large, hibiscus-like flowers are a favorite for bees and butterflies. Adding okra to your garden doesn’t just provide food for you; it supports the local ecosystem by providing a high-quality nectar source during the hottest months of the year.
Alternative Methods: Raised Beds and Containers
If you have poor native soil or limited space, okra performs exceptionally well in raised beds. The soil in raised beds warms up much faster in the spring, allowing for an earlier planting date. For container growing, ensure your pot is at least 5 gallons and has plenty of drainage holes. Because pots dry out faster, you may need to water your container-grown okra daily during mid-summer peaks.
Summary of Your Late-Summer Harvest
In conclusion, the decision to grow okra is one of the smartest moves a gardener can make to ensure a productive summer garden. By following the tips outlined in this okra planting guide, you can transform a sunny patch of dirt into a vertical forest of beautiful flowers and edible pods. Remember to wait for warm soil, harvest frequently to keep the plant producing, and don’t be afraid to experiment with different varieties. With a little patience and plenty of sunshine, you’ll be enjoying the taste of the South all season long.
Frequently Asked Questions
1. Why are my okra seeds not germinating?
The most likely culprit is cold soil. Okra needs temperatures consistently above 65°F to sprout. Additionally, the hard seed coat can prevent moisture from entering; try soaking the seeds overnight before the next attempt.
2. How often should I harvest okra pods?
During the peak of summer, you should check your plants every single day. Okra pods can grow an inch or more in 24 hours. Regular harvesting encourages the plant to produce more flowers.
3. Can I eat okra raw?
Yes! While most people cook it, small, tender okra pods are delicious when sliced thinly into salads or eaten whole as a crunchy garden snack.
4. What are the common pests for okra?
Aphids and Japanese beetles are the most common visitors. Most of the time, a sharp blast of water from a hose can knock aphids off, while Japanese beetles can be hand-picked and dropped into soapy water.
5. Why did my okra plant stop producing pods?
If the plant stops producing, it may be because you left a pod on the plant too long and it went to seed. Once the plant thinks its job of reproduction is done, it stops flowering. Remove any old, woody pods immediately to restart production.