
The Ultimate Guide to Vibrant Greens: Master Your Garden with Swiss Chard
Why You Should Add This Colorful Superfood to Your Garden
If there is one vegetable that combines beauty, resilience, and nutrition in a single package, it is Swiss chard. Often overlooked in favor of kale or spinach, Swiss chard (Beta vulgaris) is a true powerhouse that keeps on giving from late spring through the first hard frost. Whether you are dealing with a tiny balcony or a sprawling backyard, learning how to grow swiss chard is one of the most rewarding endeavors a hobbyist can take on.
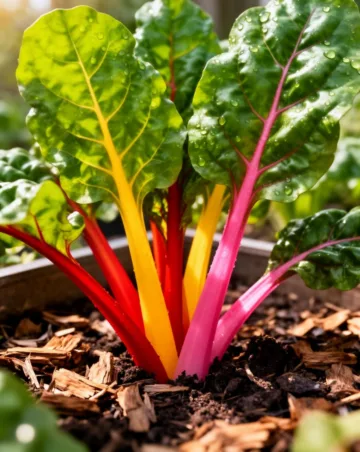
Not only are the stems a rainbow of neon pink, yellow, and orange, but the leaves are packed with vitamins A, K, and C. For those who are nervous about their green thumb, this plant is incredibly forgiving. This swiss chard planting guide will walk you through everything from soil preparation to the final harvest, ensuring you have a steady supply of gourmet greens all season long. Let’s dive into why this leafy green belongs in your garden beds this year.
Understanding Swiss Chard: The Basics
A Remote Relative of the Beet
Interestingly, Swiss chard is actually the same species as the beetroot, but it has been bred for its lush foliage and thick stems rather than a bulbous root. This means it shares the same earthy flavor profile but provides a much higher yield of edible greens per square foot.
Choosing the Right Variety
Before you start digging, you need to choose your variety. If you want a visual spectacle, “Bright Lights” is the gold standard, offering a kaleidoscope of colors. If you prefer classic flavors and high yields, “Fordhook Giant” provides massive, crinkled green leaves with thick white stalks that are perfect for sautéing.
Preparation is Key: Soil and Sun
Sunlight Requirements
While most vegetables demand full sun (at least 6–8 hours), Swiss chard is surprisingly tolerant of partial shade. In fact, if you live in a particularly hot climate, a bit of afternoon shade can prevent the leaves from wilting or becoming overly bitter during the peak of summer.
Soil Conditions and Drainage
This plant thrives in well-draining soil rich in organic matter. A pH between 6.0 and 7.0 is ideal. Before planting, mix in some well-rotted compost or aged manure to give your seedlings the nitrogen boost they need for rapid leaf development.
Step-by-Step Instructions for Success
Ready to get your hands dirty? This simple swiss chard planting guide is designed to help you navigate the process from seed to table with ease. Follow these steps to grow swiss chard like a professional horticulturist.
Step 1: Timing Your Planting
You can start seeds indoors about 4 to 6 weeks before the last frost, or sow them directly into the garden once the soil is workable in the spring. Because chard is semi-hardy, it can handle a light frost, making it an excellent early-season crop.
Step 2: Sowing the Seeds
Swiss chard seeds are actually “clusters” of multiple seeds. Plant them about 1/2 inch deep and 2 to 4 inches apart. If you are planting in rows, space the rows about 18 inches apart to allow for proper airflow.
Step 3: Thinning for Growth
Once the seedlings reach 3 inches tall, you must thin them out. If you don’t, the plants will compete for nutrients and remain stunted. Thin the plants so they are 6 to 12 inches apart. Don’t throw the thinnings away! These “microgreens” are delicious in salads.
Step 4: Consistent Watering
Keep the soil consistently moist but never waterlogged. If the soil dries out completely, the plant may “bolt” (go to seed), which makes the leaves tough and bitter. Aim for about an inch of water per week, either from rain or manual watering.
Tips from Experienced Gardeners
Mulch is Your Friend
Apply a 2-inch layer of organic mulch, such as clean straw or shredded leaves, around the base of your plants. This helps retain moisture, suppresses weeds, and keeps the leaves clean by preventing mud from splashing up during rainstorms.
Succession Planting
To ensure a harvest that lasts into the late autumn, try succession planting. Sow a new batch of seeds every 3 to 4 weeks. This ensures that as older plants begin to exhaust themselves or lose flavor, younger, tender plants are ready to take their place.
Common Mistakes to Avoid
Crowding the Plants
The most common mistake beginners make is leaving too many plants in one space. Swiss chard needs room to breathe. Poor air circulation leads to fungal issues like Cercospora leaf spot, which appears as small brown circles with purple halos on the leaves.
Ignoring the Stalks
Many new gardeners only eat the leaves. The stalks are crunchy and delicious! Treat them like celery or asparagus—they take slightly longer to cook than the leaves, so start them in the pan a few minutes earlier.
Tools and Materials Needed
You don’t need a shed full of expensive equipment to be successful. Here is a basic checklist:
- Quality Seeds: Look for heirloom varieties for the best flavor.
- Hand Trowel: For digging small holes and transplanting.
- Compost: To enrich the soil before planting.
- Garden Hoe: To keep the area between rows weed-free.
- Watering Can or Soaker Hose: To provide consistent hydration at the base of the plant.
Seasonal and Climate Considerations
Heat Tolerance
Unlike spinach, which famously “bolts” at the first sign of heat, Swiss chard is remarkably heat-tolerant. It will keep growing through the dog days of August as long as it has enough water. If the weather gets extremely hot, you might notice the growth slowing down, but it usually picks right back up as temperatures cool.
Winter Survival
In USDA zones 7 and warmer, Swiss chard can often over-winter. With a heavy layer of mulch or a cold frame, you might find yourself harvesting fresh greens in the middle of January! Even in colder zones, it is usually one of the last plants standing in the garden after the first snow.
Benefits of Growing Swiss Chard
High Yield, Low Effort
Swiss chard is a “cut and come again” vegetable. You don’t have to harvest the whole plant at once. By picking only the outer leaves, the center continues to produce new growth. This makes it one of the most efficient uses of garden space available.
Pest Resistance
While aphids and leaf miners occasionally take an interest, chard is generally less prone to pests than brassicas like broccoli or kale. This makes it a great choice for organic gardeners who want to avoid using chemical sprays.
Alternative Methods: Containers and Hydroponics
Container Gardening
If you lack a backyard, you can easily grow chard in pots. Use a container that is at least 12 inches deep and 12 inches wide. A single plant per pot is usually best to allow for the large root system to develop. This also allows you to move the plant into the shade if the summer sun becomes too intense.
Hydroponic Growing
Swiss chard performs exceptionally well in Deep Water Culture (DWC) or Nutrient Film Technique (NFT) hydroponic systems. Because it is a foliage-heavy plant, it responds well to high-nitrogen nutrient solutions, often growing much faster than it would in traditional soil.
Conclusion: Bringing Color to Your Table
Mastering the art of the swiss chard planting guide is a journey that pays dividends in both health and beauty. From those first vibrant sprouts to the final frosty harvests of November, these greens are a testament to the joy of home gardening. When you grow swiss chard, you aren’t just planting a vegetable; you are creating a living tapestry of color that nourishes your body and enhances your landscape.
Remember to keep your soil rich, your water consistent, and your rows thinned out. With these simple tips, your garden will be the envy of the neighborhood. Happy gardening, and enjoy the delicious, earthy crunch of your homegrown Swiss chard!
Frequently Asked Questions
Is Swiss chard a perennial?
Swiss chard is technically a biennial. This means it has a two-year life cycle. In the first year, it produces the leaves we love to eat. In the second year, after a period of cold, it will send up a flower stalk to produce seeds and then die. Most gardeners grow it as an annual.
How do I know when to harvest Swiss chard?
You can harvest the leaves at any size. Baby leaves (2-3 inches) are great for salads, while mature leaves (10-12 inches) are better for cooking. Always harvest the outermost leaves first to encourage the center to keep growing.
Why are there tunnels in my chard leaves?
This is likely caused by leaf miners. These tiny larvae live inside the leaf tissue. To manage them, look for small white egg clusters on the underside of leaves and crush them, or remove and discard affected leaves immediately.
Can you eat the stalks of Swiss chard raw?
Yes, but they are quite firm and have a very strong earthy flavor. Most people prefer them blanched, sautéed, or pickled. The “Rainbow” varieties tend to have a slightly milder flavor in the stalks compared to the white-vined varieties.
Does Swiss chard grow back after cutting?
Yes! As long as you don’t damage the “growing point” at the very center of the base, the plant will continue to produce new leaves throughout the entire growing season.



