
The Ultimate Green Superfood: Why You Should Add Kale to Your Garden Today
There is a reason why kale has become the poster child for healthy living over the last decade. This hardy, leafy green is a powerhouse of vitamins A, C, and K, and it offers a level of versatility in the kitchen that few other vegetables can match. Whether you are dreaming of crispy kale chips, nutrient-dense morning smoothies, or hearty winter stews, learning how to grow kale is one of the most rewarding projects a home Gardener can undertake. Not only is it one of the most resilient crops in the vegetable patch, but it also thrives in various climates, often tasting even sweeter after a light frost.
For those just starting their horticultural journey, these kale growing tips will help you navigate the process from seed to harvest with confidence. Kale belongs to the Brassica family, making it a close relative of broccoli, cabbage, and Brussels sprouts. However, unlike its finicky cousins, kale is remarkably forgiving. It can handle a bit of shade, it isn’t too picky about soil as long as it has good drainage, and it survives temperatures that would make a tomato plant wither in an instant. If you are looking for a high-yield, low-maintenance crop that pays dividends in nutrition, you have come to the right place.
Understanding the Varieties: Choosing the Right Kale
Curly Kale (The Classic Choice)
This is the variety most people recognize from the grocery store. It has bright green, tightly ruffled leaves and a pungent, peppery flavor. It is exceptionally hardy and grows in a beautiful, bushy habit, making it an attractive addition to ornamental edible landscapes.
Lacinato Kale (Dinosaur or Tuscan Kale)
Lacinato kale is a favorite among chefs. It features long, slender, dark blue-green leaves with a bumpy texture that resembles dinosaur skin—hence the nickname. It is slightly sweeter and more delicate than curly kale, making it perfect for raw salads and massaged kale recipes.
Russian Kale (The Cold-Weather Specialist)
If you live in a region with particularly harsh winters, Red or White Russian kale is your best bet. The leaves are fringed and resemble oak leaves, often with striking purple or red veins. This variety is known for being the most tender and sweet of all the kales, especially when harvested as baby greens.
Getting Started: Site Selection and Soil Preparation
Sunlight Requirements
While kale loves full sun (at least six hours a day), it is one of the few vegetables that will tolerate partial shade. In fact, if you are growing kale in a warmer climate, afternoon shade can actually prevent the plant from bolting (going to seed) too quickly when the summer heat hits.
Soil Quality and pH
Kale prefers well-drained soil rich in organic matter. Aim for a soil pH between 6.0 and 7.5. If your soil is too acidic, you can add garden lime; if it is too alkaline, compost or peat moss can help balance it out. Since kale is a “heavy feeder,” particularly of nitrogen, mixing in aged manure or high-quality compost before planting is a smart move.
Your Path to Harvest: Step-by-Step Instructions
Starting your journey to grow kale is simple whether you choose to start seeds indoors or sow them directly into the garden bed. Follow these steps to ensure a bountiful harvest:
- Timing: For a spring crop, sow seeds 4-6 weeks before the last frost. For a fall crop, sow seeds 6-8 weeks before the first expected frost.
- Sowing: Plant seeds about 1/4 to 1/2 inch deep. If sowing directly, space seeds about 3 inches apart. Once they reach 3 or 4 inches in height, thin them so the plants are 12 to 18 inches apart.
- Transplanting: If you started seeds indoors, harden them off by gradually exposing them to outdoor conditions for a week before transplanting.
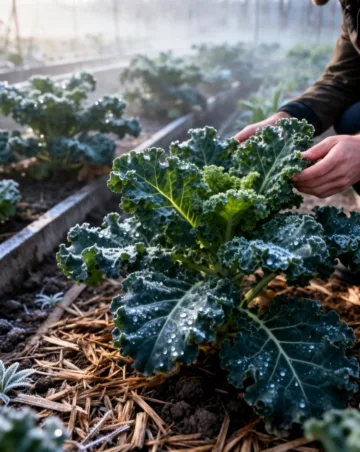
- Watering: Keep the soil consistently moist but not waterlogged. Mulching around the base of the plants with straw or shredded leaves helps retain moisture and keeps the roots cool.
- Feeding: Apply a balanced organic liquid fertilizer every 4 weeks to support the rapid leaf growth. Applying these kale growing tips regarding nutrition will ensure your leaves stay tender rather than becoming tough and bitter.
- Harvesting: You can begin picking “baby” leaves after about 30 days. For mature leaves, wait about 60 days. Always harvest the lowest, outermost leaves first, allowing the center of the plant to continue producing new growth.
Pro-Level Advice: Tips from Experienced Gardeners
The Sweetening Frost
Experienced gardeners know a secret: don’t pull your kale when the first frost hits. Frost causes the plant to convert its starches into sugars, resulting in a much sweeter, less bitter leaf. Some varieties can even survive under a blanket of snow!
Succession Planting
To have kale available all year round, don’t plant all your seeds at once. Sow a new batch every 2-3 weeks. This ensures that as older plants begin to exhaust themselves or bolt, you have fresh, young plants ready to take their place.
Intercropping for Space
Because kale grows upright, you can plant smaller, faster-growing crops like radishes or lettuce in the shadows beneath the kale leaves. This maximizes your garden’s output and helps shade the smaller plants during hot spells.
Common Mistakes to Avoid
Crowding the Plants
It is tempting to leave all the seedlings in the row, but kale needs air circulation. Crowded plants are more susceptible to powdery mildew and aphid infestations. Give them at least a foot of breathing room.
Ignoring the Underside of Leaves
Many pests, specifically aphids and cabbage worms, hide on the underside of the leaves. Check your plants weekly. A sharp blast of water from a hose is often enough to dislodge these hitchhikers before they cause significant damage.
Waiting Too Long to Harvest
If you leave the bottom leaves on the plant for too long, they will turn yellow and become tough. Regular harvesting encourages the plant to put its energy into new, delicious growth.
Essential Tools and Materials
Soil and Amendments
You will need high-quality compost or aged manure. If your soil is heavy clay, consider adding perlite or vermiculite to improve drainage.
Hand Tools
A sturdy trowel for transplanting and a pair of sharp garden shears or micro-tip snips for harvesting are essential. Using shears instead of pulling the leaves by hand prevents damage to the main stem.
Protective Gear
Floating row covers are a lifesaver for kale. They allow light and water in but keep the Cabbage White butterfly away, preventing them from laying eggs that turn into hungry green caterpillars.
Seasonal and Climate Considerations
Cool Season Success
Kale is primarily a cool-season crop. It grows best when temperatures are between 60°F and 70°F. In northern climates, kale can be grown throughout the entire summer. In the South, it is often grown as a winter crop, planted in October and harvested through March.
Managing Summer Heat
If you find your kale struggling in July heat, increase your watering frequency and ensure there is a thick layer of mulch. If the plant starts to produce a tall flower stalk in the center, it is “bolting.” While the flowers are edible and great for bees, the leaves will become very bitter, signaling it is time to replant for the fall.
The Benefits of Growing Your Own Kale
Unmatched Freshness
Store-bought kale can often be limp and devoid of the crispness found in home-grown varieties. When you grow it yourself, you can harvest exactly what you need moments before eating, preserving the maximum amount of Vitamin C.
Cost-Effective Nutrition
A single packet of seeds costs less than one bunch of organic kale at the market. From that one packet, you can grow dozens of plants that will produce food for months on end.
Pest Control Control
By growing your own, you control what goes on your food. You can choose organic methods and avoid the synthetic pesticides often found on commercially grown greens.
Alternative Growing Methods
Container Gardening
You don’t need a massive backyard to grow these greens. A 12-inch deep pot is sufficient for one large kale plant. This is a great option for balcony gardeners or those with limited sun in their main garden beds.
Hydroponics and Indoor Greens
Many dwarf varieties of kale excel in hydroponic systems. You can also grow kale as “microgreens” on a sunny windowsill. Simply harvest them when they are only two inches tall for an intensely flavored garnish.
Final Thoughts on Your Green Journey
Embarking on a mission to grow kale is one of the best decisions you can make for your garden and your health. This plant’s resilience makes it an ideal candidate for those still developing their “green thumb,” while its culinary range keeps it interesting for seasoned pros. By following the kale growing tips outlined in this guide—centering on soil health, proper spacing, and timely harvesting—you will enjoy a steady supply of greens regardless of the season. Remember, gardening is a journey of observation; watch how your plants respond to the weather and the soil, and they will tell you exactly what they need. Happy planting!
Frequently Asked Questions
1. How often should I water my kale?
Kale likes consistent moisture. Generally, 1 to 1.5 inches of water per week is ideal. If the soil feels dry an inch below the surface, it’s time to water.
2. Is kale a perennial or an annual?
Kale is technically a biennial. It grows leaves in its first year, and if it survives the winter, it will flower and go to seed in its second year. Most gardeners treat it as an annual and replant every year.
3. Why are my kale leaves turning yellow?
Yellowing leaves can be a sign of nitrogen deficiency, overwatering, or simply old age. If it’s the bottom leaves, it’s usually just the plant maturing. If it’s the whole plant, check your soil drainage and consider a nitrogen-rich fertilizer.
4. Can I grow kale from grocery store scraps?
While you can sometimes get a kale stem to root in water, it is not the most effective way to grow it. It is much more reliable to start from seeds or nursery transplants.
5. My kale has tiny gray bugs on it. What are they?
Those are likely aphids. They love the nooks and crannies of curly kale. You can wash them off with a garden hose or use an organic insecticidal soap to keep them under control.



