
Grow Your Own Home‑Harvest: A Beginner’s Guide to a Modern Victory Garden
Opening
When the world faced food shortages during the last great wars, ordinary families turned their backyards into productive plots that fed both bodies and spirits. Today, that same spirit of resilience and self‑reliance lives on in what many call a victory garden. By creating a wartime vegetable garden, self sufficient garden, you not only enjoy fresh produce, you also join a long tradition of community‑focused gardening that helps you save money, reduce waste, and reconnect with nature.
What Is a Victory Garden?
Historical Roots
During World War I and II, governments encouraged citizens to plant crops to ease pressure on commercial food supplies. These plots were dubbed “victory gardens” because every carrot and tomato harvested was seen as a contribution to the war effort.
Modern Meaning
Today the term refers to any small‑scale, intensive garden aimed at producing a substantial portion of a household’s vegetables. It’s about maximizing yield in limited space, using simple techniques that any beginner can master.
Planning Your Space
Assessing Light and Soil
- Observe sunlight patterns for at least a week; most vegetables need 6‑8 hours of direct sun.
- Perform a simple soil test (pH, texture) or use a store‑bought kit.
- Amend heavy clay or sandy soil with compost and well‑rotted manure.
Choosing the Right Layout
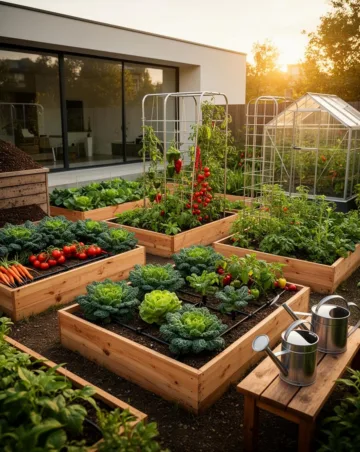
Consider raised beds, container rows, or a classic in‑ground strip garden. Raised beds are especially beginner‑friendly because they improve drainage and soil quality.
Step‑by‑Step Instructions
Follow these clear stages to launch your own victory garden while keeping the spirit of a wartime vegetable garden, self sufficient garden alive.
Step 1 – Sketch a Simple Garden Plan
- Draw a rough map of your plot (including pathways for easy access).
- Allocate space for high‑yield crops like beans, peas, and leafy greens.
- Leave room for companion plants (e.g., marigolds to deter pests).
Step 2 – Prepare the Soil
- Clear weeds and debris.
- Loosen soil to a depth of 12‑15 inches.
- Incorporate 2‑3 inches of compost or aged manure.
Step 3 – Select Beginner‑Friendly Vegetables
- Root crops: carrots, radishes, beets.
- Leafy greens: lettuce, spinach, kale.
- Legumes: bush beans, snap peas.
- Seasonal staples: zucchini, tomatoes, peppers.
Step 4 – Plant with Purpose
- Sow seeds at the recommended depth; thin seedlings to avoid overcrowding.
- Use the “three‑plant rule”: for every 1 sq ft of space, aim for 3 plants that mature at different times to extend harvest.
Step 5 – Water Wisely
- Water early in the morning to reduce evaporation.
- Apply 1‑2 inches of water per week, more during hot spells.
- Mulch with straw or shredded leaves to retain moisture.
Step 6 – Maintain and Harvest
- Inspect plants weekly for pests; hand‑pick insects or use neem oil.
- Harvest leafy greens regularly to encourage new growth.
- Pick ripe beans, peas, and tomatoes promptly to keep the plant productive.
Tips from Experienced Gardeners
- Rotate crop families each season to prevent soil‑borne diseases.
- Plant “catch‑crops” like mustard greens between main rows to suppress weeds.
- Use a rain barrel to collect water, reducing reliance on tap water.
- Start seeds indoors during colder months for an early start.
Common Mistakes to Avoid
- Over‑watering – leads to root rot and fungal issues.
- Planting too densely – reduces airflow and yields.
- Ignoring soil health – depleted soil produces weak plants.
- Skipping crop rotation – encourages pests and disease buildup.
Tools or Materials Needed
- Garden fork or spade
- Hoe or hand cultivator
- Measuring tape and garden stakes
- Compost or organic fertilizer
- Mulch (straw, wood chips, or leaves)
- Watering can or hose with a gentle spray nozzle
Seasonal or Climate Considerations
Cool‑Season Planting
In most temperate zones, sow cool‑season crops (lettuce, peas, radishes) in early spring or late summer.
Warm‑Season Planting
Wait until soil temperatures reach 60 °F before planting tomatoes, peppers, and beans. In hot climates, use shade cloth to protect delicate seedlings.
Adapting to Shorter Growing Seasons
Choose fast‑maturing varieties (e.g., “Early Girl” tomatoes) and employ season‑extending techniques like cold frames or row covers.
Benefits of This Gardening Method
- Food security: Fresh, nutritious produce at your fingertips.
- Cost savings: Reduce grocery bills, especially on organic produce.
- Environmental impact: Lower carbon footprint by cutting food miles.
- Physical activity & mental health: Gardening reduces stress and provides gentle exercise.
Alternative Methods
- Square foot gardening: Maximizes space by planting in 1‑sq‑ft grids.
- Vertical gardening: Uses trellises, pallets, or hanging baskets for climbing crops.
- Container gardening: Ideal for renters or those with limited soil.
Conclusion
Starting a victory garden is a rewarding way to become more self‑reliant while honoring a historic tradition of community gardening. By following the step‑by‑step guide and incorporating the advice of seasoned growers, you’ll create a thriving wartime vegetable garden, self sufficient garden that delivers fresh, healthy food all season long.
Frequently Asked Questions
1. How much space do I need for a small victory garden?
Even a 4 × 8‑ft raised bed can produce enough leafy greens and beans for a family of four if managed well.
2. Can I grow a victory garden in containers?
Yes. Use large pots (at least 12‑inches deep) for root crops and trellised varieties for beans and peas.
3. What are the best pest‑free methods for a beginner?
Companion planting, regular hand‑picking, and organic sprays like neem oil are effective and easy to apply.
4. How often should I fertilize my garden?
Apply a balanced organic fertilizer at planting and once mid‑season; avoid over‑fertilizing leafy greens which can lead to bitter flavors.
5. When is the ideal time to start sowing seeds indoors?
Start seeds 6‑8 weeks before the last frost date for your region; transplant seedlings after the soil has warmed to at least 55 °F.



